


Fireduino TFT 图片显示
更新时间:2017-08-08 阅读:14068
目录
Fireduino TFT
Fireduino TFT 采用与传统的Arduino TFT 同属一些列的LCD 驱动器,为ST7735S,与Fireduino 通过I8080 接口连接,比传统Arduino TFT 的SPI 方式 刷新速率快一个级别。
Fireduino TFT库
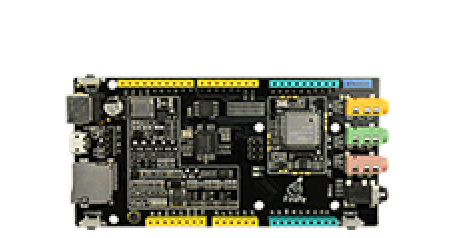
Fireduino TFT 库 基于ST7735S 驱动扩展 Adafruit GFX 而成的TFT库,Adafruit GFX负责绘制图形,ST7735S 负责驱动LCD 显示屏,它兼容 Adafruit GFX API,Fireduino 连接 TFT 后如下图:

Fireduino TFT 图片显示
本案例演示如何在Fireduino 的TFT配件上显示图像,在TF卡读取文件后,随机定位显示在屏幕上。
硬件要求
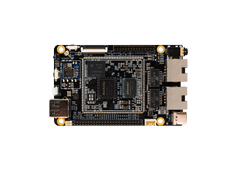
1.Fireduino board
2.Fireduino TFT board
3.TF Card
4.图像文件
代码
开始之前
使用TFT 屏幕,首先得包含TFT库以及需要使用到的TF库头文件。
#include <TF.h>
#include <TFT.h>
定义你的TFT 屏幕,并创建一个实例对象
TFT TFTscreen = TFT();
有一种特殊的数据类型用于描述图像信息,创建它的对象。
PImage logo;setup()
1.初始化屏幕。
2.设置背景色。
3.显示静态文本提示信息在屏幕。
4.初始化串口,以供信息打印输出。
5.初始化TF卡。
6.从TF卡载入图像文件。
void setup()
{
  // initialize the GLCD and show a message
  // asking the user to open the serial line
  delay(1);
  TFTscreen.begin();
  delay(1);
  TFTscreen.background(255, 255, 255);
  TFTscreen.stroke(0, 0, 255);
  TFTscreen.println();
  TFTscreen.println(F("Arduino TFT Bitmap Example"));
  TFTscreen.stroke(0, 0, 0);
  TFTscreen.println(F("Open serial monitor"));
  TFTscreen.println(F("to run the sketch"));
  // initialize the serial port: it will be used to
  // print some diagnostic info
  Serial.begin(9600);
  while (!Serial) {
    // wait for serial port to connect. Needed for native USB port only
  }
  // clear the GLCD screen before starting
  TFTscreen.background(255, 255, 255);
  // try to access the SD card. If that fails (e.g.
  // no card present), the setup process will stop.
  Serial.print(F("Initializing SD card..."));
  if (!SD.begin()) {
    Serial.println(F("failed!"));
    return;
  }
  Serial.println(F("OK!"));
  // initialize and clear the GLCD screen
  TFTscreen.begin();
  TFTscreen.background(255, 255, 255);
  // now that the SD card can be access, try to load the
  // image file.
  logo = TFTscreen.loadImage("arduino.bmp");
  if (!logo.isValid()) {
    Serial.println(F("error while loading arduino.bmp"));
  }
}
loop()
1.判断图像文件的正确性。
2.随机生成图片显示的位置。
3.把图片显示在屏幕上。
void loop() {
  // don't do anything if the image wasn't loaded correctly.
  if (logo.isValid() == false) {
    return;
  }
  Serial.println(F("drawing image"));
  // get a random location where to draw the image.
  // To avoid the image to be draw outside the screen,
  // take into account the image size.
  int x = random(TFTscreen.width() - logo.width());
  int y = random(TFTscreen.height() - logo.height());
  // draw the image to the screen
  TFTscreen.image(logo, x, y);
  // wait a little bit before drawing again
  delay(1500);
}
例程序 -- TFT 图片显示
// include the necessary libraries
#include <TF.h>
#include <TFT.h>  // Arduino LCD library
TFT TFTscreen = TFT();
// this variable represents the image to be drawn on screen
PImage logo;
void setup() {
  // initialize the GLCD and show a message
  // asking the user to open the serial line
  delay(1);
  TFTscreen.begin();
  delay(1);
  TFTscreen.background(255, 255, 255);
  TFTscreen.stroke(0, 0, 255);
  TFTscreen.println();
  TFTscreen.println(F("Arduino TFT Bitmap Example"));
  TFTscreen.stroke(0, 0, 0);
  TFTscreen.println(F("Open serial monitor"));
  TFTscreen.println(F("to run the sketch"));
  // initialize the serial port: it will be used to
  // print some diagnostic info
  Serial.begin(9600);
  while (!Serial) {
    // wait for serial port to connect. Needed for native USB port only
  }
  // clear the GLCD screen before starting
  TFTscreen.background(255, 255, 255);
  // try to access the SD card. If that fails (e.g.
  // no card present), the setup process will stop.
  Serial.print(F("Initializing SD card..."));
  if (!SD.begin()) {
    Serial.println(F("failed!"));
    return;
  }
  Serial.println(F("OK!"));
  // initialize and clear the GLCD screen
  TFTscreen.begin();
  TFTscreen.background(255, 255, 255);
  // now that the SD card can be access, try to load the
  // image file.
  logo = TFTscreen.loadImage("arduino.bmp");
  if (!logo.isValid()) {
    Serial.println(F("error while loading arduino.bmp"));
  }
}
void loop() {
  // don't do anything if the image wasn't loaded correctly.
  if (logo.isValid() == false) {
    return;
  }
  Serial.println(F("drawing image"));
  // get a random location where to draw the image.
  // To avoid the image to be draw outside the screen,
  // take into account the image size.
  int x = random(TFTscreen.width() - logo.width());
  int y = random(TFTscreen.height() - logo.height());
  // draw the image to the screen
  TFTscreen.image(logo, x, y);
  // wait a little bit before drawing again
  delay(1500);
}